Digital Artwork Idea for Middle School Teens
I’m learning that middle school kids love to customize settings on school Chromebooks. My son’s favorite tricks are creating a custom mouse cursor, inverting the screen color mode, swapping funny animated gifs as profile pictures, and making custom Chrome browser backgrounds.
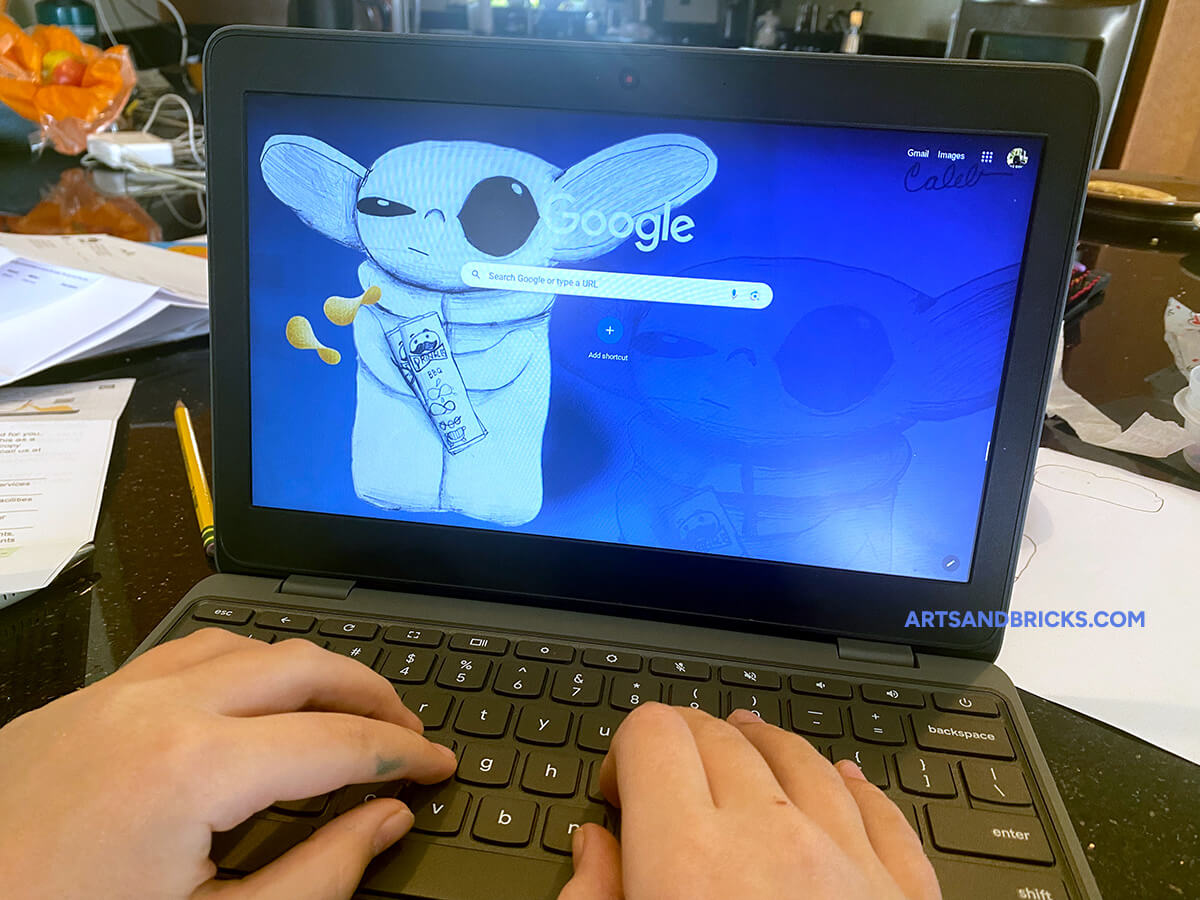
Today, we’ll show you how we created a custom animated Chrome browser background depicting Baby Yoda shaking a can of BBQ Pringles!
Note: This Project Requires Photoshop and Design Skills
As background, I’m a graphic and web designer. You can view my portfolio on kellybarkhurst.com. Arts and Bricks (this blog) is one of the ways I’m including my children in my design work and sharing my passion for art and design with them. As my children get older, our projects can become more and more technical. This animated Chrome background is my first shared project in PhotoShop with my son; he loves how it turned out, and I’m thrilled!
Custom Kid-Drawn Animated Chrome Background
Below, you’ll read an overview of what we did to create the final animated gif. If you’re technically minded and can access Adobe Photoshop, you can watch and read the step-by-step details on my blog that shares tech tips for designers and developers, designertofullstack.com. There, you can read about topics like how to make your animated gif work in WordPress Gutenberg because, by default, it won’t!
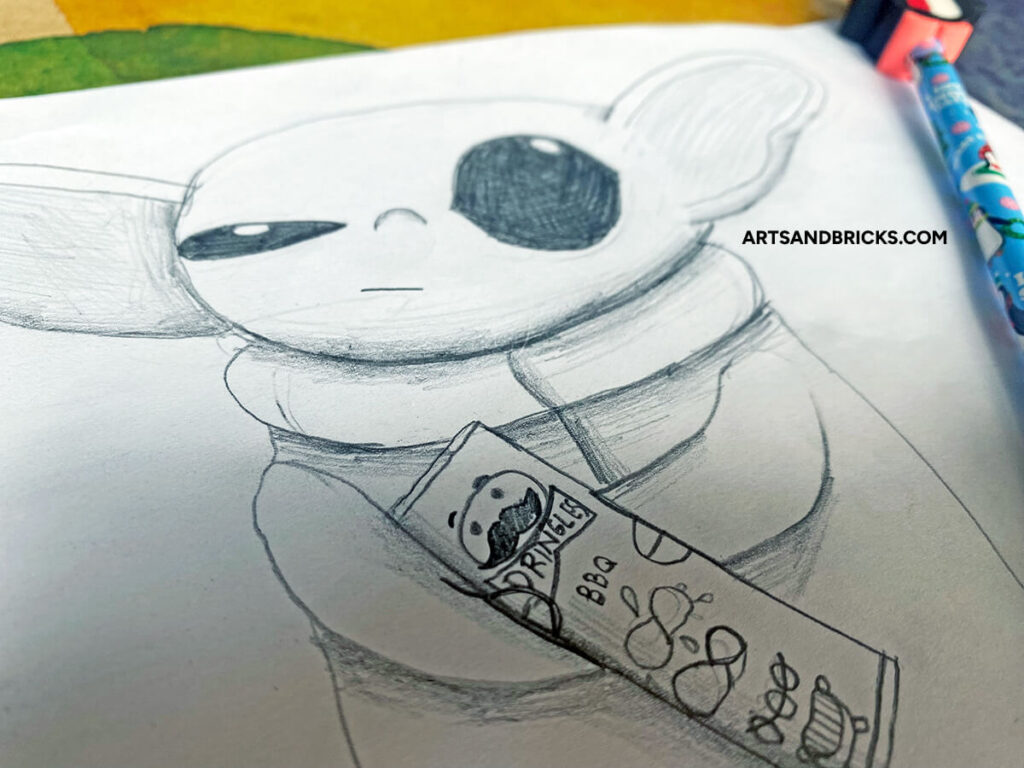
Step 1: Drawing Baby Yoda with Pringles
The first step is analog; get your paper and pencils and start drawing and shading. My son drew Grogu with a regular pencil on a white sheet of computer paper. This doesn’t have to be fancy.
Step 2: Scan your Drawing
Next, create a digital copy of your drawing. We used a scanner, but you could also take a picture of your artwork.
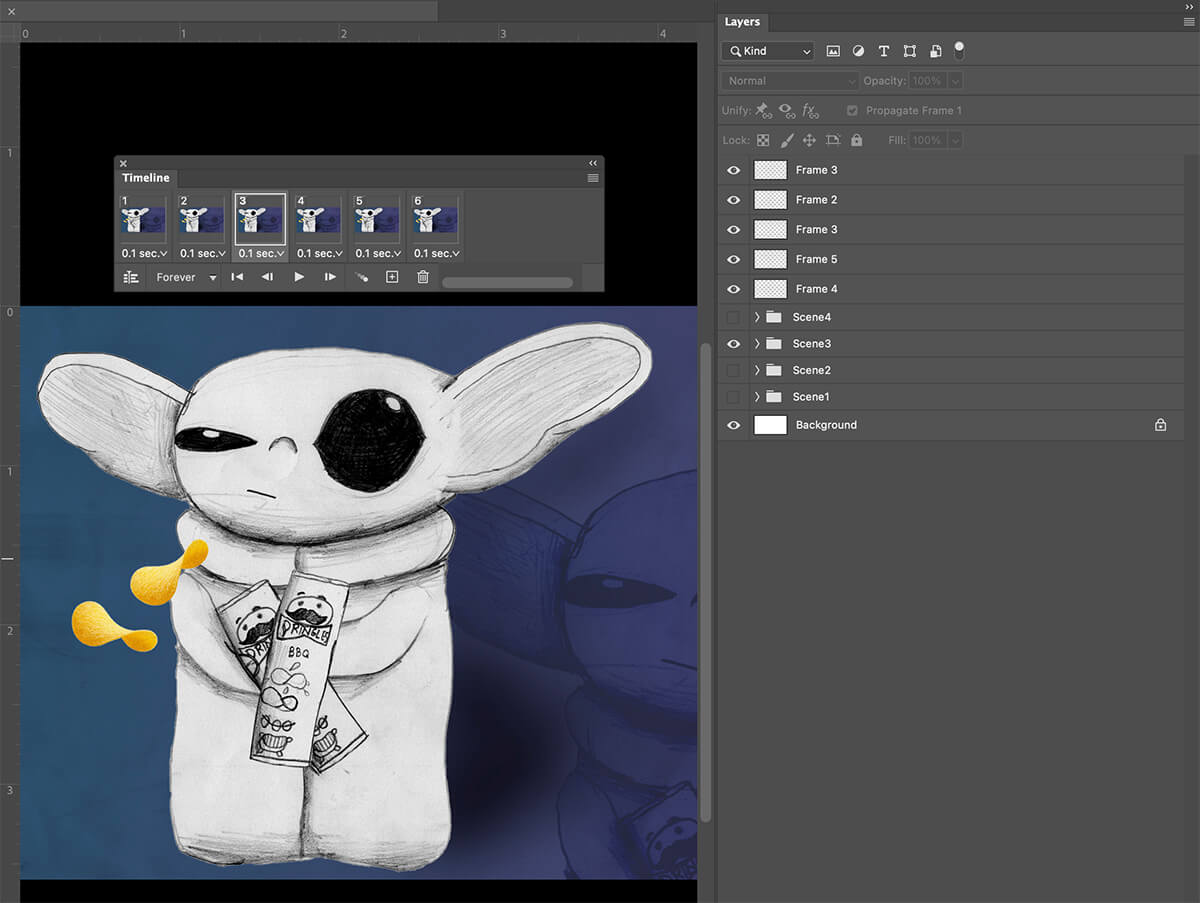
Step 3: Use PhotoShop to adjust your image’s coloring and design the background
We opened the scanned drawing as a jpg file in Photoshop. Next, we designed our layout. This stage included cutting out Baby Yoda from the background, making color adjustments, adding a gradient background, and signing our name using the paintbrush tool.
The next step was cutting out the can of Pringles from the background and making the can its own layer. We also found a photograph of a Pringles chip on a white background. We removed the background and duplicated the chip layer to show chips popping out of the can.
Finally, we prepped for animation. In our case, we created four views of the shaking can. Each view became a self-contained folder in our Layers panel. The difference between each view was simple: we rotated the chip can and slightly rotated and moved the placement of the chips.
Step 4: Use PhotoShop to create the animation
Photoshop has a Timeline option, shown by going to Window > Timeline. This feature allows you to turn on and off layers or folders to create transitions and animations. We used six frames that each show one of our four scenes. This loops forever to create the animation. To create the shake effect, we repeat two scenes.
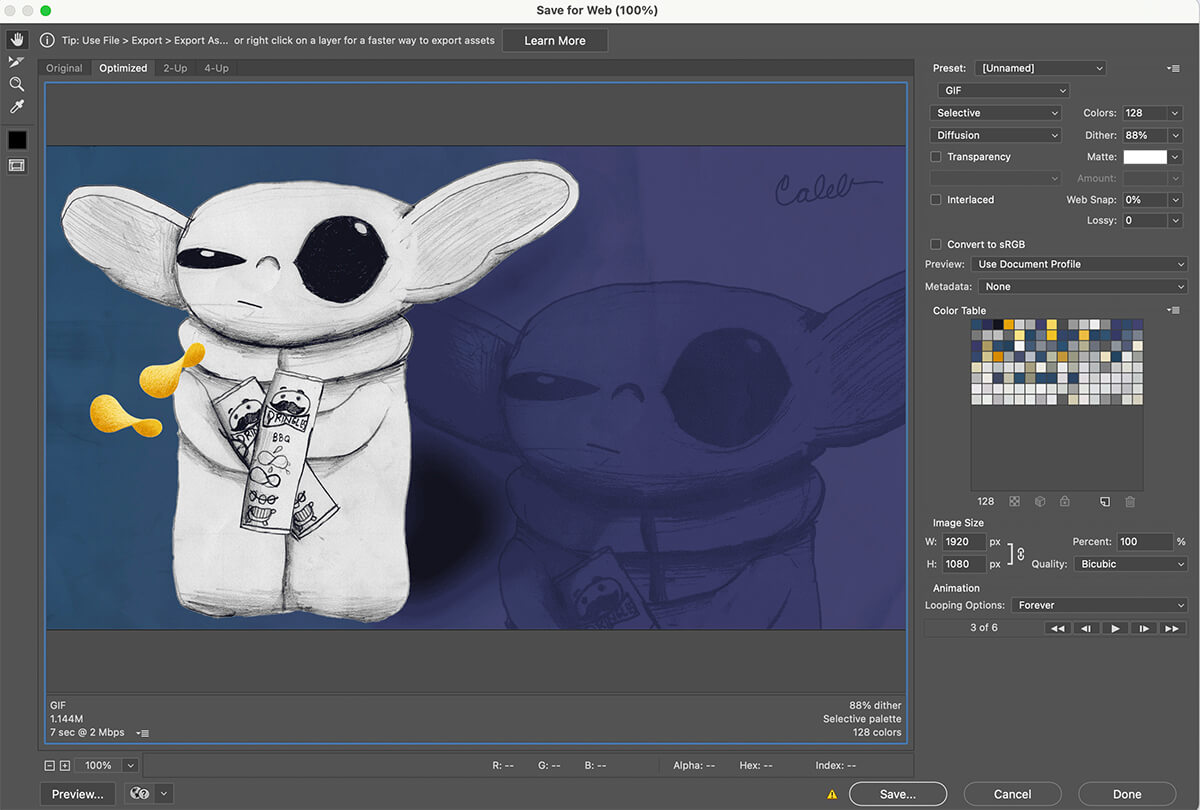
Step 5: Export as an Animated GIF
This is how you get your animated design as a file type that you can import into Google Chrome. You’ll use PhotoShop’s Export > Save for web (legacy). Choose GIF and under Looping Options: Forever. Then, choose SAVE (not Done) from the bottom right. You’ll have a file that ends with .gif.
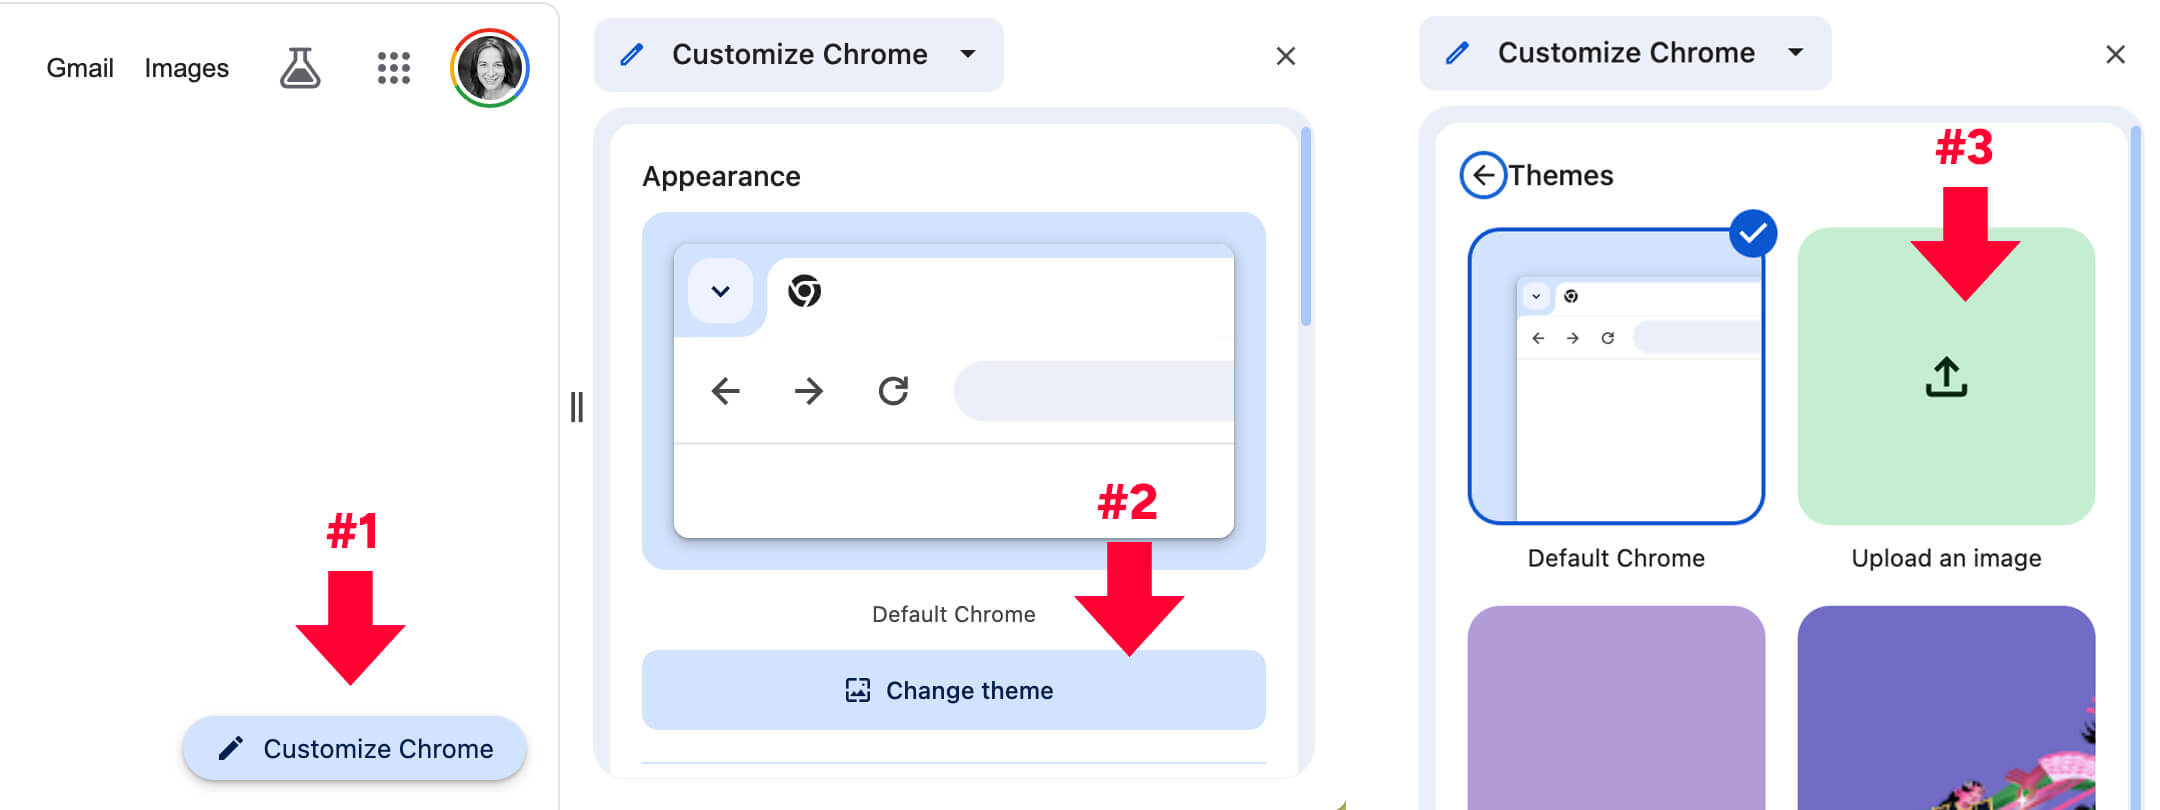
Step 6: Upload to your Chrome Settings
Open Chrome and go to your Chrome start page or home page. Look for a button (bottom right side) that reads, “Customize Chrome.” Next, click the button that reads, “Change Theme.” Finally, choose “Upload an image.” This will prompt you to select your .gif file. You can upload images or animated gifs. Enjoy!
Final Results
A custom home screen animated gif created with a middle school student’s drawing!
Thoughts?
So what do you think? Would your middle school student enjoy a custom Chrome Book background created from their artwork? Would they want to try to make it themselves? Would you pay for the digitization of their artwork?
Let us know!
Save to Pinterest
Leave a Reply